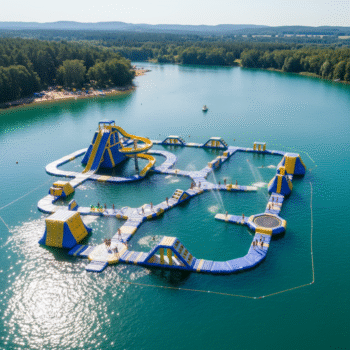
For resort operators and commercial recreation managers, investing in a floating water park is a significant capital decision. Success depends not just on the quality of the individual inflatables, but heavily on the floating water park design and layout. A poorly planned configuration can lead to bottlenecks, safety hazards, and reduced guest throughput. Conversely, a strategic layout optimizes traffic flow, maximizes capacity, and ensures a safer environment for swimmers of varying skill levels.
This guide explores the technical and operational aspects of designing modular water parks for open water environments, focusing on connectivity, capacity planning, and zoning strategies.
The Modular Advantage: Building for Flexibility
Modern commercial water parks are built on a modular system. Unlike single-piece units, modular designs allow operators to scale their investment over time. You might start with a 30-person capacity circuit and expand to a 100-person park the following season by adding new obstacles.
Key Modular Components:
- Runways & Connectors: These are the arteries of the park. They connect major features and provide resting zones.
- Action Towers: High-traffic centerpieces featuring climbing walls and slides.
- Transition Pieces: Curves, T-junctions, and Y-junctions that dictate the shape of the course.
- Entry/Exit Points: Low-profile boarding platforms designed to help swimmers climb out of the water easily.
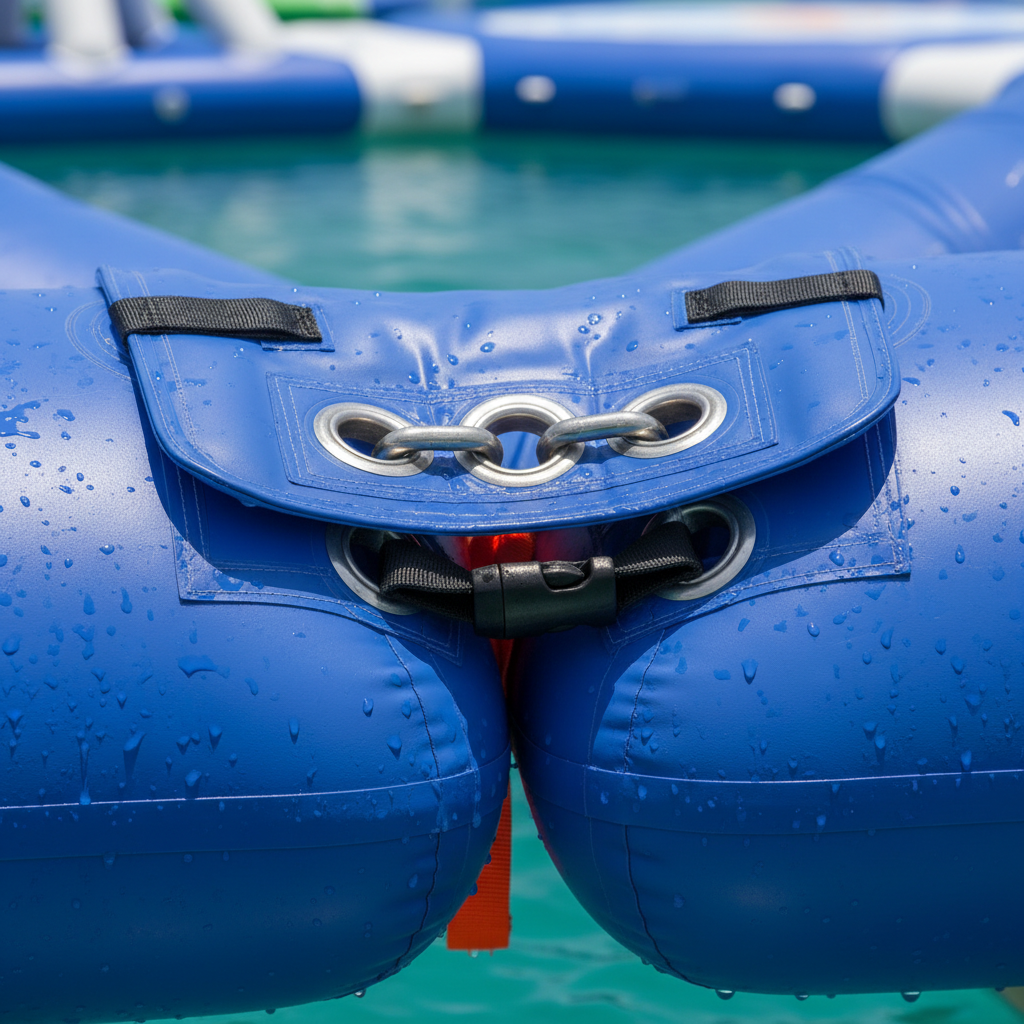
When sourcing from manufacturers, ensure that the connection systems are standardized. High-quality parks typically use a combination of heavy-duty 316 stainless steel D-rings, connection straps, and a safety flap (often secured with Velcro) to cover the gap between modules. This prevents limb entrapment and creates a seamless surface for users.
Layout Strategies for Traffic Flow
The shape of your park determines how users move through it. Controlling the flow is essential for safety and preventing overcrowding on popular obstacles.
1. The Circuit (Loop) Design
A continuous loop is the most efficient design for high-capacity parks. It encourages one-way traffic, reducing collisions between users moving in opposite directions. Swimmers enter at one point, traverse the obstacles, and exit or loop back around. This is ideal for busy resorts where keeping the line moving is critical for ROI.
2. The Hub-and-Spoke
This layout features a central massive obstacle (like a giant tower or trampoline) with runways branching out. This allows lifeguards to be positioned centrally for a 360-degree view. However, it can create congestion at the center if not managed properly.
3. The Linear Race Track
Best suited for competitive events or narrow water bodies. This design focuses on speed and difficulty but may have lower overall capacity since users must return to the start via the water or a separate return lane.
Capacity Planning and Safety Zones
Calculating the capacity of a floating water park design requires analyzing the total surface area and the type of obstacles included. A general industry rule of thumb is to allocate approximately 3-5 square meters per person to ensure safety, though this varies by local regulations.
Creating Difficulty Zones
To maximize appeal and safety, segregate the park into zones based on difficulty:
- Zone 1: Junior/Beginner (Shallow Water): Place low-profile items here, such as small slides, balance beams, and wide runways. These should be closer to the shore or beach where water depth is manageable (typically 1.5m to 2m minimum, depending on product specs).
- Zone 2: Intermediate (Active): Include monkey bars, hurdles, and medium-sized trampolines. This area bridges the gap between casual play and athletic challenge.
- Zone 3: Advanced (Deep Water): The furthest point from entry should house the tallest towers, cliffs, and catapult blobs. These items require deeper water (often 2.5m+) for safe landings. Segregating these high-adrenaline items keeps younger children away from high-impact zones.
Technical Specifications & Anchoring
A layout is only as good as its stability. Designing for lakes versus oceans requires different anchoring approaches.
Material Considerations:
For commercial open-water use, the industry standard is 0.9mm PVC Tarpaulin. This material is reinforced with a high-strength mesh, offering resistance to UV rays, saltwater, and abrasion. Seams should be heat-welded rather than glued to ensure airtight integrity over years of use.
Anchoring Systems:
Do not underestimate the force of wind and waves on a large inflatable structure. A professional layout plan must include an anchoring map.
- Concrete Blocks: Common for muddy or sandy lake bottoms.
- Helical Screws: effective for specific seabed types.
- Bungee Shock Cords: Essential for connecting the anchor line to the park. These absorb the energy from waves and user movement, preventing damage to the D-rings on the inflatables.
Manufacturing and Quality Assurance
When commissioning a custom park, verify the manufacturer’s testing protocols. Reliable factories will fully inflate the park in their facility to test connections and pressure retention before shipping. Ask for:
- 3D Renderings: To visualize the layout and flow before production.
- Pressure Relief Valves: Essential for preventing over-inflation due to thermal expansion on hot days.
- Reinforcement Strips: Look for extra layering at high-stress points like anchor rings and handle bases.
Buying Guide: From Concept to Installation
Planning a park involves several logistical steps. Here is a checklist for procurement managers:
| Factor | Consideration |
|---|---|
| Lead Time | Allow 30–60 days for production, plus shipping time (often 30+ days for sea freight). |
| カスタマイズ | Most manufacturers can match Pantone colors and print logos. Confirm artwork file formats (AI or PDF) early. |
| MOQ | While individual pieces can be bought, full parks usually have a minimum order value or size to be cost-effective for shipping. |
| Installation | Will you need a factory technician to supervise installation, or will you use local divers? Ensure manuals are provided in English. |
FAQs: Inflatable Water Park Design
Q: What is the minimum water depth required?
A: Generally, a minimum depth of 1.5m to 2.5m is required, depending on the height of the obstacles. Tall slides require deeper water for safety.
Q: Can I change the layout after purchasing?
A: Yes, the modular nature allows you to rearrange pieces. However, you must adjust your anchoring plan accordingly.
Q: How long do these parks last?
A: With proper maintenance, seasonal cleaning, and storage, a high-quality 0.9mm PVC park typically lasts 3–5 years or more in commercial settings.
Q: Do you provide anchor weights?
A: Most manufacturers do not ship concrete weights due to high shipping costs. It is more cost-effective to source concrete blocks or sandbags locally.
Q: How do I request a custom design?
A: Provide the dimensions of your water area and your target capacity. Our design team can create a custom 3D layout to fit your specific beach or lake.
Start Your Water Park Project
A well-planned floating water park is a major attraction that drives revenue and guest satisfaction. By focusing on efficient traffic flow, distinct difficulty zones, and robust anchoring, you can build a safe and profitable operation.
Ready to design a custom layout for your resort? Contact us today to request a quote or get a sample material kit.